How I Successfully Converted My 35mm Slides to Digital: A Step-by-Step Guide from an Expert’s Perspective
As I rummaged through dusty boxes in my attic, I stumbled upon a treasure trove of memories: a collection of 35mm slides from family vacations, birthdays, and milestones long past. Each slide was a window to a moment frozen in time, but the challenge was clear—how could I breathe new life into these fading images? The answer lay in the art of converting 35mm slides to digital format. This process not only preserves the rich colors and intricate details of those cherished moments but also makes sharing them with loved ones easier than ever. In an age where digital memories reign supreme, transforming my slides into high-quality digital files felt like a journey back in time, allowing me to relive and share stories that were once confined to the shadows of my attic. Join me as I explore the ins and outs of this rewarding endeavor, where nostalgia meets modern technology, and discover how I unlocked the magic of my past.
I Converted My 35mm Slides to Digital and Here Are My Honest Recommendations

KODAK Slide N SCAN Film & Slide Scanner Digitizer with 5” LCD Screen, Quickly Convert Negatives & Slides to Digital 22MP JPEG Photos, Compatible with 135, 126 and 110 Film & Slides

135 Film Negative Scanner Slide Viewer, Converts 35mm Film Negatives & Slides to Digital JPEG Images, 2.4 LCD Screen, with Quick Slide Holder
Magnasonic All-in-One 24MP Film Scanner with Large 5″ Display & HDMI, Converts 35mm/126/110/Super 8 Film & 135/126/110 Slides into Digital Photos, Built-in Memory (FS71)
1. KODAK Slide N SCAN Film & Slide Scanner Digitizer with 5” LCD Screen, Quickly Convert Negatives & Slides to Digital 22MP JPEG Photos, Compatible with 135, 126 and 110 Film & Slides
As someone who values preserving memories, I’m genuinely excited to share my thoughts on the KODAK Slide N SCAN Film & Slide Scanner Digitizer. This product is a fantastic tool for anyone looking to transform their old photographs and slides into digital files. With the ability to convert negatives and slides into stunning 22MP JPEG photos, this scanner breathes new life into cherished memories, making it a must-have for nostalgia enthusiasts and families alike.
One of the standout features of the KODAK Slide N SCAN is its ability to save old photo memories seamlessly. The scanner supports a variety of film types, including 135, 110, and 126mm negatives and slides. This versatility means I can digitize not only my own collection but also the treasures passed down from previous generations. The convenience of saving directly to an SD card (though it’s not included) means I can easily store and access my digital files without fuss.
The 5” LCD display is another remarkable feature that enhances the user experience. The large, crystal-clear screen offers a wide viewing angle, making it easy for me to preview and edit photos instantly. I find it especially enjoyable to share these memories with friends and family, and the gallery mode allows me to showcase my digitized slides as an elegant digital picture frame in my home or office. It’s the perfect conversation starter and a beautiful way to keep the memories alive.
When it comes to convenience, the KODAK Slide N SCAN shines with its easy-load film inserts. The quick-feeding tray technology allows for continuous loading, which means I can scan multiple slides and negatives in no time. The inclusion of various adapters for different film types and a cleaning brush ensures that I have everything I need for a smooth scanning process. Plus, with USB and HDMI cables provided, I can easily connect the scanner to my devices for a seamless experience.
Editing is made simple with the advanced capture software that allows me to enhance, resize, and convert my photos with just a touch of a button. The ease of choosing film type and adjusting color and brightness means that I can personalize my scanned images to my liking without navigating through complex settings. This user-friendly approach makes the entire scanning process enjoyable and accessible, even for those who may not be tech-savvy.
Lastly, the chic design of the KODAK Slide N SCAN is not just aesthetically pleasing but also incredibly compatible with modern technology. It accommodates SD or SDHC cards up to 32GB and connects effortlessly to any Type-C USB-enabled computer. This means I can easily transfer my digitized memories to various devices without any hassle. Its elegant design also ensures it blends seamlessly with my home décor, making it a stylish addition to any workspace.
the KODAK Slide N SCAN Film & Slide Scanner Digitizer is an exceptional product that I believe will resonate with anyone looking to preserve their photographic history. Its combination of functionality, ease of use, and stylish design makes it an ideal choice for digitizing old memories. I wholeheartedly recommend considering this scanner to help you take that important step toward preserving your cherished moments. Don’t let those precious memories fade away; invest in the KODAK Slide N SCAN and bring them back to life!
Feature Description Resolution 22MP JPEG Photos Compatibility Supports 135, 110, 126mm negatives and slides Display 5” LCD Screen with Gallery Mode Loading Mechanism Convenient Easy-Load Film Inserts with Quick-Feeding Tray Editing Single Touch Editing with Advanced Capture Software Storage Compatible with SD/SDHC Cards up to 32GB Connection USB and HDMI Connectivity
Get It From Amazon Now: Check Price on Amazon & FREE Returns
2. Kodak Slide N Scan Max Digital Film Slide Scanner, Black/Yellow (RODFS70)

As someone who cherishes old memories, I was thrilled to discover the Kodak Slide N Scan Max Digital Film Slide Scanner. This device, with its sleek black and yellow design, is not just a scanner; it’s a gateway to preserving and sharing the memories captured in my old photographs and slides. The ability to convert color and black-and-white negatives (135, 110, 126mm) and 50mm slides to digital files is a game changer for anyone who values nostalgia.
One of the standout features of this scanner is its impressive 13/22MP resolution. This allows me to view, edit, and convert my old images with stunning clarity. I can easily save these images directly to an SD card (which isn’t included but is easily purchasable). Imagine being able to revive those precious moments from decades ago, turning faded memories into vibrant digital files that can be shared with family and friends. It’s not just about saving photos; it’s about saving a piece of my history.
The 7” LCD display is another highlight that I absolutely love. The large, crystal-clear screen with a wide viewing angle makes it incredibly easy to preview and edit photos on the spot. I find myself sharing these images with friends and family instantly, or even using it as an elegant digital picture frame in my home or office. It adds a personal touch to my décor while also serving a functional purpose. This dual functionality makes the Kodak Slide N Scan not just a tool, but a conversation starter.
Convenience is key, and Kodak has mastered it with the easy-load film inserts. The quick-feeding tray technology allows for continuous loading, making the scanning process not only fast but also simple. It comes with a 50mm slide holder and adapters for various film types, plus a cleaning brush and USB cables (though it’s worth noting that an HDMI cable isn’t included). This comprehensive package ensures that I have everything I need to get started right away, allowing me to focus on what truly matters reliving those memories.
Editing is made effortless with the advanced capture software that enhances, resizes, and converts photos with just a single touch. There are no complicated screens or settings to navigate. I can easily choose my film type, adjust color and brightness, and even assign date/time stamps to my images. This level of user-friendliness is perfect for someone like me, who wants to enjoy the process without getting bogged down by technicalities.
Lastly, the Kodak Slide N Scan Max is uber compatible. It handles all my old slides and negatives with ease and supports SD or SDHC cards (up to 32GB). Connecting to any Type-C USB-enabled computer is a breeze, which means I can quickly transfer my scanned images to my devices. Plus, its gorgeous design seamlessly blends with my home décor, making it an attractive addition to my workspace.
the Kodak Slide N Scan Max Digital Film Slide Scanner is an invaluable tool for anyone looking to preserve their cherished memories. With its impressive features and user-friendly design, it makes the process of converting old slides and negatives into digital files enjoyable and efficient. If you value preserving your past and want to share those memories with loved ones, I genuinely believe that investing in this scanner is a decision you won’t regret. It’s time to bring your memories back to life!
Feature Description Resolution 13/22MP for high-quality scans of old photos and slides Display 7” LCD with gallery mode for previewing and editing Film Inserts Quick-feeding tray with 50mm slide holder and adapters Editing Advanced software for easy enhancements and adjustments Compatibility Supports SD/SDHC cards and connects to Type-C USB-enabled computers
Get It From Amazon Now: Check Price on Amazon & FREE Returns
3. 135 Film Negative Scanner Slide Viewer, Converts 35mm Film Negatives & Slides to Digital JPEG Images, 2.4 LCD Screen, with Quick Slide Holder
As someone who has a strong appreciation for nostalgia and the memories captured in old photographs, I can’t help but feel excited about the 135 Film Negative Scanner Slide Viewer. This device offers a fantastic solution for those of us looking to breathe new life into our cherished 35mm film negatives and slides. In an age where digital is king, this scanner allows me to convert my old memories into digital JPEG images effortlessly. The fact that it operates as a stand-alone device without needing a computer is a significant plus for me, as it makes the process not only simpler but also more convenient.
One of the standout features of this scanner is its ability to support different film types, including positives, negatives, and black-and-white modes. This versatility means I can tackle various projects without worrying about compatibility issues. I appreciate that I can scan my slides in Positive Mode and switch to Negative Mode for my negatives. This thoughtful design is perfect for anyone, like me, who has a mixed collection of film types and wants to ensure that every precious memory gets digitized correctly.
The Adjustable Fast Slide Feeder is another feature that I find incredibly useful. This slide feeder allows me to load slides quickly and continuously, significantly speeding up the scanning process. I can simply place my slides into the compartment and push them into the scanner one by one. It’s so convenient! I should note, though, that the thickness of the framed slides should not exceed 2mm, which is something to keep in mind when preparing my slides for scanning.
When it comes to image quality, the 5/10 megapixel independent film/slide scanner really delivers. With a resolution of 1800 DPI, I can expect my digitized images to maintain a high level of detail and clarity. This is crucial for preserving the quality of those treasured memories. I also appreciate that the scanned images are saved directly to an SD card (up to 32GB), which makes it easy to manage and transfer my photos later on. While the SD card is not included, it’s a minor inconvenience considering the value this product brings.
The 2.4-inch TFT LCD screen is another thoughtful addition, allowing me to preview, view, and edit my scanned images easily. The 480×234 resolution may not be the highest on the market, but it’s sufficient for checking my work before saving. The compatibility with various operating systems, including Windows and Mac OS, is an added bonus, ensuring that I can seamlessly transfer my digitized memories to my computer for further editing or sharing with family and friends.
Lastly, the support for USB transmission means I can connect the scanner to my computer and easily transfer the photos saved on the SD card. This functionality adds another layer of convenience, making it simple to back up my digitized memories. Overall, the 135 Film Negative Scanner Slide Viewer provides a comprehensive solution for anyone looking to preserve their film memories in a digital format.
if you’re like me and have a collection of old 35mm negatives and slides, this scanner is definitely worth considering. Its user-friendly design, high-quality scanning capabilities, and versatile film support make it an excellent investment for preserving precious memories. I wholeheartedly recommend giving this scanner a try; you won’t regret it!
Feature Description Stand-alone Operation No computer required for scanning, making it convenient. Film Type Support Positive, Negative, and Black & White modes available. Fast Slide Feeder Allows quick and continuous loading of slides. Image Resolution 1800 DPI for high-quality digitized images. LCD Screen 2.4-inch TFT display for easy preview and editing. USB Transmission Connects to computer for easy photo transfer.
Get It From Amazon Now: Check Price on Amazon & FREE Returns
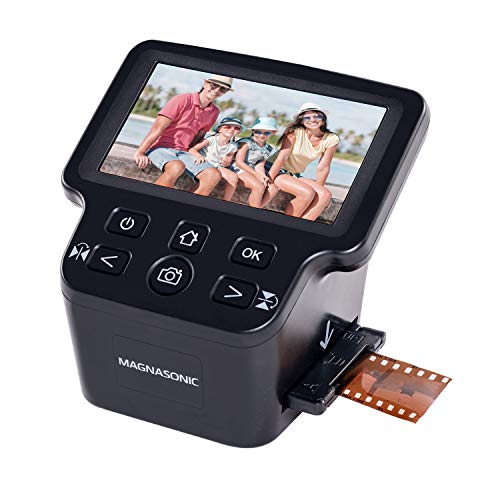
4. Magnasonic All-in-One 24MP Film Scanner with Large 5″ Display & HDMI, Converts 35mm/126/110/Super 8 Film & 135/126/110 Slides into Digital Photos, Built-in Memory (FS71)
As someone who values preserving memories, I was genuinely excited when I came across the Magnasonic All-in-One 24MP Film Scanner (FS71). This product is a game-changer for anyone looking to convert their old film and slides into digital format. The process of digitizing cherished memories can often feel overwhelming, but this scanner makes it a breeze. With the ability to convert 35mm, 126, 110, and Super 8 film as well as 135, 126, and 110 slides into high-resolution 24MP JPEG files, I felt a sense of relief knowing that my precious moments could be saved for future generations.
The standout feature for me is the large 5” LCD screen. It provides a vivid and clear display that allows me to view my film, slides, and scanned images directly on the scanner. It’s incredibly satisfying to see the images pop up on that screen, reminding me of the good times captured in those moments. Additionally, the option to connect via HDMI to a TV or monitor means I can share these memories with family and friends easily. It’s like having a mini photo gallery at my fingertips!
Another impressive aspect of the FS71 is its built-in memory and expandable storage options. With 128MB of internal memory and an SD card slot that accommodates up to 128GB, I can scan and save an extensive collection of photos without worrying about running out of space. This feature is particularly beneficial for those with large collections of film, allowing me to digitize a lifetime of memories without any hassle.
One of the most appealing factors of this scanner is that it requires no computer. I appreciate how user-friendly it is; there’s no need for complicated or expensive photo-editing software or driver installations. The ability to adjust brightness, RGB color correction, and even flip and mirror images directly on the scanner makes the entire process straightforward and efficient. I can be up and running in no time, scanning each photo in less than five seconds with the included fast-loading film trays. This efficiency is a significant time-saver, especially for someone like me who tends to get caught up in the nostalgia of the memories.
In summary, the Magnasonic All-in-One 24MP Film Scanner (FS71) offers a fantastic solution for those looking to preserve their photographic history. Its combination of high-resolution scanning, ease of use, and convenient viewing options makes it an excellent choice for anyone wanting to digitize their old films and slides. The thoughtful design and functionality of this scanner have genuinely impressed me, and I believe it can do the same for you. If you have a collection of old films gathering dust, now might just be the perfect time to invest in this scanner and bring those memories back to life!
Feature Description Resolution 24MP high-resolution JPEG files Display 5″ LCD screen for direct viewing Memory 128MB built-in memory, expandable up to 128GB via SD card Connectivity HDMI output for TV or monitor viewing Ease of Use No computer needed; user-friendly interface Scanning Speed Less than 5 seconds per photo
Get It From Amazon Now: Check Price on Amazon & FREE Returns
Why Converting 35mm Slides to Digital Helped Me
When I stumbled upon my old box of 35mm slides, a wave of nostalgia washed over me. These slides captured precious moments from my past—family vacations, birthdays, and milestones that I had almost forgotten. Converting them to digital format was a decision that changed how I interact with my memories. It allowed me to preserve these irreplaceable moments for future generations. By digitizing my slides, I ensured that they wouldn’t fade or deteriorate over time, safeguarding my memories against the ravages of time.
The convenience of having my slides in a digital format was another major benefit I experienced. I could easily share these memories with family and friends through social media or email, making it simple to relive those cherished moments together. Instead of having to set up a projector and screen, I could view and enjoy my slides on my computer, tablet, or even my smartphone. This accessibility made it easier for me to revisit my past anytime I wanted, turning those once-static images into living memories that I could engage with regularly.
Moreover, digitizing my 35mm slides opened up a world of creative possibilities. I could enhance and edit the images, create beautiful slideshows
Buying Guide: Convert 35Mm Slides to Digital
Understanding the Need for Conversion
I realized the importance of converting my 35mm slides to digital when I found a box of my family’s memories sitting in the attic. I wanted to preserve these precious moments and make them easily shareable with family and friends. Going digital not only protects the slides from deterioration but also allows me to enjoy them on modern devices.
Choosing the Right Conversion Method
When I began my journey to convert my slides, I learned there are several methods available. I could either use a dedicated slide scanner, employ a professional service, or use a flatbed scanner with a transparency adapter. Each method has its pros and cons, and I had to weigh my options based on my budget, the number of slides, and the quality I desired.
Assessing the Quality of Conversion
Quality was a top priority for me. I wanted to ensure that the colors were vibrant and the details were sharp. I researched the resolution capabilities of different scanning methods. Higher resolutions typically meant better quality, especially if I planned to print larger versions of the images. I found that scanning at least 300 DPI was a good starting point for maintaining quality.
Budget Considerations
I had to set a budget for my project. Converting slides can range from affordable to quite pricey, depending on the method chosen. I compared the costs of purchasing a scanner versus paying for a service. While a scanner is a one-time investment, professional services often charge per slide, which can add up quickly if I have a large collection.
Determining the Volume of Slides
Before starting, I counted the number of slides I wanted to convert. This helped me decide whether I should invest in a scanner or use a service. With a smaller number of slides, a professional service might be more convenient. For larger collections, I found that owning a scanner would save me money in the long run.
Finding the Right Resolution and Format
I had to decide on the resolution and file format for my digital images. I opted for JPEG for everyday use, but I also saved some as TIFF files for archiving due to their superior quality. The resolution settings were crucial for future printing needs, and I made sure to choose options that would give me flexibility.
Preparing the Slides for Conversion
Before the conversion process, I cleaned my slides to ensure they were free of dust and fingerprints. This step was essential for achieving the best possible results. I used a soft brush and a microfiber cloth, taking care to handle the slides gently to avoid any damage.
Testing Before Committing
I learned the importance of testing the chosen method. I scanned a few slides first to evaluate the quality and adjust the settings if necessary. This way, I could ensure that the final results met my expectations before committing to the entire collection.
Storing Digital Files Safely
Once I converted my slides, I needed to think about storage. I created backups on external hard drives and cloud storage to ensure that my digital memories were protected. I organized the files in folders by year and event to make them easy to find later.
Sharing My Digital Memories
Finally, I wanted to share my converted slides with family and friends. I created digital albums and even printed some photos for special occasions. Sharing my family’s history became a rewarding experience, and I was glad I took the time to convert those slides to digital format.
In summary, converting 35mm slides to digital is a fulfilling project. By considering the methods, quality, budget, and storage options, I successfully preserved my memories for years to come.
Author Profile

-
Hi, I’m Jocelyn Gillon. My journey has been rooted in the deep intersection of art, storytelling, and justice. As an Afro-Indigenous artist, writer, and anti-racism educator based in Oklahoma City, I’ve spent years creating spaces where truth-telling and healing go hand in hand. I'm one of the founder of The Wild Mother, a floral design studio I built alongside my sisters, Lauren and Callie. Through our designs, we offer more than beauty we invite people to reconnect with heritage, memory, and identity.
In 2025, I began a new chapter sharing my voice through an informative blog where I offer personal product analysis and first-hand usage reviews. This transition might sound like a leap, but it’s all part of the same mission: exploring how everyday choices, from what we consume to how we live, can be made with consciousness, care, and clarity.
Latest entries
- November 23, 2025Personal RecommendationsWhy I Switched to a 0.5 ML Insulin Syringe: My Personal Experience and Expert Insights
- November 23, 2025Personal RecommendationsUnlocking Radiant Skin: My Personal Journey with the 0.5 mm Dermaroller
- November 23, 2025Personal RecommendationsWhy I Trust 0.9% Sodium Chloride Irrigation USP: My Personal Insights and Expert Opinion
- November 23, 2025Personal RecommendationsDiscovering the Benefits of 0 Calorie Protein Powder: My Personal Journey to Guilt-Free Nutrition